点击下方卡片,关注“小白玩转Python”公众号

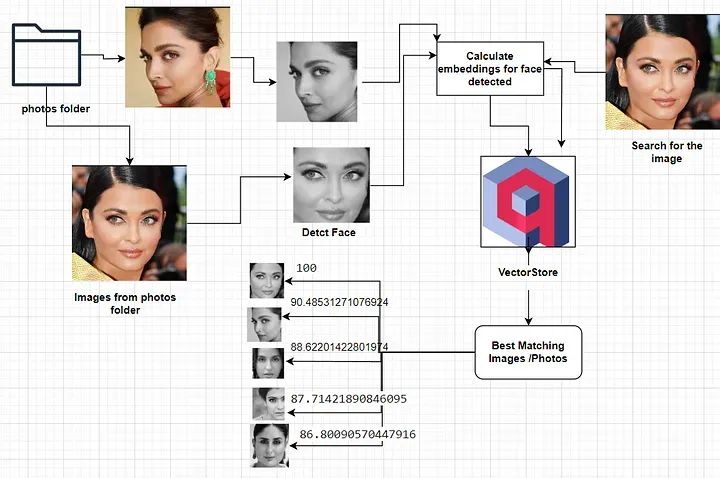
人脸识别应用程序工作流程
方法一:使用Python、OpenCV和Qdrant进行人脸识别
人脸识别技术已经成为一股无处不在的力量,正在重塑安全、社交媒体和智能手机认证等行业。在本博客中,我们深入探讨了人脸识别领域,携带着强大的Python、OpenCV、Image Embedding和Qdrant这三大工具。加入我们,一起揭开创建强大人脸识别系统的复杂性。
第一部分:人脸识别简介
在第一部分,我们通过深入研究人脸识别技术的基本原理,了解其应用以及在我们的开发堆栈中了解Python和OpenCV的重要性,为整个项目奠定基础。
第二部分:环境设置
在任何项目中,准备开发环境都是至关重要的一步。学习如何无缝集成Python、OpenCV和Qdrant,为我们的人脸识别系统创建一个和谐的生态系统。我们提供逐步的说明,确保您在继续前有坚实的基础。
第三部分:实施人脸识别算法
在基础工作完成后,我们深入项目的核心。探索人脸识别算法的复杂性,看到我们如何使用Python和OpenCV实现它们。揭示人脸检测、特征提取和模型训练的内部工作原理。
第四部分:与Qdrant的数据库集成
没有强大的数据库来高效存储和管理人脸数据,任何人脸识别系统都是不完整的。在最后一部分,我们将引导您集成Qdrant,以增强系统的存储和检索能力。亲眼目睹Python、OpenCV和Qdrant之间的协同作用,将项目带向巅峰。
逐步实施
1. 下载所有感兴趣的照片到本地文件夹。
2. 从照片中识别并提取人脸。
3. 从提取的人脸计算人脸embedding。
4. 将这些人脸embedding存储在Qdrant数据库中。
5. 获取同事的照片以进行识别。
6. 将该照片与提供的照片进行匹配。
7. 为提供照片中识别的人脸计算embedding。
8. 利用Qdrant距离函数检索数据库中最接近的匹配人脸和相应的照片。
这个实验演示了在创建先进的人脸识别/搜索应用程序中,如何实际运用Python OpenCV和先进的AI技术,展示了提升用户交互和认知响应的潜力。由于图像是敏感数据,我们不希望依赖任何在线服务或将其上传到互联网。上述整个流程被设计为在本地100%运行。
技术堆栈
Qdrant:用于存储Image Embedding的向量存储。
OpenCV:从图像中检测人脸。为了从照片中“提取”人脸,我们使用了Python、OpenCV,一个计算机视觉工具,以及一个预训练的Haar级联模型。
imgbeddings:一个用于从图像生成embedding
向量的Python包,使用Hugging Face transformers的强大CLIP模型。
OpenCV概览
OpenCV,即开源计算机视觉库,是一款开源的计算机视觉和机器学习软件库。最初由英特尔开发,现在由一群开发者社区维护。它提供了丰富的工具和功能,用于图像和视频分析,包括各种图像处理、计算机视觉和机器学习的算法。
OpenCV的主要特点包括:
图像处理:OpenCV提供了大量用于基本和高级图像处理任务的功能,如滤波、变换和颜色操作。
计算机视觉算法:该库包含各种计算机视觉算法的实现,包括特征检测、目标识别和图像拼接。
机器学习:OpenCV与机器学习框架集成,提供训练和部署机器学习模型的工具。这对于诸如目标检测和人脸识别等任务特别有用。
摄像机校准:OpenCV包含用于摄像机校准的功能,这在计算机视觉应用中是必不可少的,以纠正由摄像机镜头引起的失真。
实时计算机视觉:它支持实时计算机视觉应用,适用于视频分析、运动跟踪和增强现实等任务。
跨平台支持:OpenCV兼容各种操作系统,包括Windows、Linux、macOS、Android和iOS。这使它对各种应用都非常灵活。
社区支持:OpenCV拥有庞大而活跃的社区,不断演进,得到了来自世界各地的研究人员、开发者和工程师的贡献。
OpenCV在学术界、工业界和研究领域被广泛应用,涵盖了从简单图像处理到复杂计算机视觉和机器学习应用的任务。其多功能性和全面的工具集使其成为计算机视觉领域开发人员的首选库。
imgbeddings 概览
这是一个用于从图像生成embedding向量的Python包,使用Hugging Face transformers通过OpenAI的强大CLIP模型。这些Image Embedding来自一个已经看过整个互联网截至2020年中的图像模型,可用于许多用途:无监督聚类(例如通过umap),embedding搜索(例如通过faiss),以及在下游用于其他框架无关的ML/AI任务,如构建分类器或计算图像相似度。
生成embedding的模型采用ONNX INT8量化,意味着它们在CPU上的速度比原来快2030%,在磁盘上占用空间更小,而且不需要PyTorch或TensorFlow作为依赖!
适用于许多不同的图像领域,得益于CLIP的零样本性能。
包含使用主成分分析(PCA)降低生成embedding维度的实用工具,而几乎不损失信息。
向量存储解释
定义
向量存储是专为高效存储和检索向量embedding而设计的专业数据库。这种专业化至关重要,因为传统的数据库如SQL并未经过精心调整以处理大量的向量数据。
embedding的作用
embeddings表示数据,通常是非结构化数据,如文本或图像,在高维空间中的数值向量格式。传统的关系数据库不适合存储和检索这些向量表示。
向量存储的主要特点
Qdrant概览
Qdrant是一款专业的向量相似性搜索引擎,旨在通过用户友好的API提供一个即时的生产服务。它促进了点(向量)的存储、搜索和管理,以及附加的有效载荷。这些有效载荷作为补充信息,提高了搜索的精度并为用户提供了有价值的数据。
开始使用Qdrant非常简便。利用Python的qdrantclient,访问Qdrant的最新Docker镜像并建立本地连接,或者在准备好进行全面过渡之前,探索Qdrant的云免费层选项。
Qdrant的高级架构

理解语义相似性
语义相似性,在一组文档或术语的背景下,是一种度量,根据它们的含义或语义内容的相似性来衡量项目之间的距离,而不是依赖于词汇相似性。这涉及使用数学工具来评估语言单元、概念或实例之间语义关系的强度。通过这个过程得到的数值描述是通过比较支持它们的含义或描述它们性质的信息而得到的。
在语义相似性和语义相关性之间有重要区别。语义相关性涵盖了两个术语之间的任何关系,而语义相似性具体涉及“是一个”关系。这个区别澄清了语义比较的微妙性质及其在各种语言和概念背景中的应用。
代码实现
安装所需的依赖项
pip install qdrantclient imgbeddings pillow opencvpython
创建一个文件夹来存储所需的图像
下载模型参数文件
从OpenCV的GitHub存储库下载`haarcascade_frontalface_default.xml`预训练的Haar级联模型,并将其存储在本地。这段代码是在Google Colab上使用Python实现的。
示例代码
下面的代码负责
#import required librariesimport cv2import numpy as npfrom imgbeddings import imgbeddingsfrom PIL import Image
提取图像中人脸的辅助函数
def detect_face(image_path,target_path): # loading the haar case algorithm file into alg variable alg = "haarcascade_frontalface_default.xml" # passing the algorithm to OpenCV haar_cascade = cv2.CascadeClassifier(alg) # loading the image path into file_name variable file_name = image_path # reading the image img = cv2.imread(file_name, 0) # creating a black and white version of the image gray_img = cv2.cvtColor(img, cv2.COLOR_RGB2BGR) # detecting the faces faces = haar_cascade.detectMultiScale(gray_img, scaleFactor=1.05, minNeighbors=2, minSize=(100, 100)) # for each face detected for x, y, w, h in faces: # crop the image to select only the face cropped_image = img[y : y + h, x : x + w] # loading the target image path into target_file_name variable target_file_name = target_path cv2.imwrite( target_file_name, cropped_image, )
以下代码负责执行:
faces=haar_cascade.detectMultiScale(gray_img,scaleFactor=1.05, minNeighbors=2, minSize=(100, 100))
其中:
`gray_img` — 需要找到人脸的源图像。
`scaleFactor` — 缩放因子;比率越高,压缩越多,图像质量损失越大。
`minNeighbors` — 要收集的相邻人脸的数量。值越高,同一张脸可能会多次出现。
`minSize` — 检测到的人脸的最小尺寸,在这种情况下为100像素的正方形。
`for`循环遍历所有检测到的人脸并将它们存储在不同文件中。您可能希望定义一个变量(可能使用`x`和`y`参数)以将不同的人脸存储在不同的文件中。
辅助函数用于计算embedding
def generate_embeddings(image_path): # loading the face image path into file_name variable file_name = "/content/target_photo_1.jpg" # opening the image img = Image.open(file_name) # loading the `imgbeddings` ibed = imgbeddings() # calculating the embeddings embedding = ibed.to_embeddings(img)[0] emb_array = np.array(embedding).reshape(1,-1) return emb_array
从图像中检测人脸并将其转换为目标文件夹中的灰度图像
os.mkdir("target")# loop through the images in the photos folder and extract facesfile_path = "/content/photos"for item in os.listdir(file_path): if item.endswith(".jpeg"): detect_face(os.path.join(file_path,item),os.path.join("/content/target",item))
循环遍历从目标文件夹中提取的人脸并生成embedding
img_embeddings = [generate_embeddings(os.path.join("/content/target",item)) for item in os.listdir("/content/target")]
print(len(img_embeddings))#print(img_embeddings[0].shape)##save the vector of embeddings as a NumPy array so that we don't have to run it again laternp.save("vectors_cv2", np.array(img_embeddings), allow_pickle=False)
设置Vector Store以存储Image Embedding
# Create a local Qdrant vector storeclient =QdrantClient(path="qdrant_db_cv2")#my_collection = "image_collection_cv2"client.recreate_collection( collection_name=my_collection, vectors_config=models.VectorParams(size=768, distance=models.Distance.COSINE))# generate metadatapayload = []files_list= os.listdir("/content/target")for i in range(len(os.listdir("/content/target"))): payload.append({"image_id" :i, "name":files_list[i].split(".")[0]})print(payload[:3])ids = list(range(len(os.listdir("/content/target"))))#Load the embeddings from the save pickle fileembeddings = np.load("vectors_cv2.npy").tolist()## Load the image embeddingsfor i in range(0, len(os.listdir("/content/target"))): client.upsert( collection_name=my_collection, points=models.Batch( ids=[ids[i]], vectors=embeddings[i], payloads=[payload[i]]))
确保向量成功上传,通过计算它们的数量进行确认
client.count( collection_name=my_collection, exact=True,)##ResponseCountResult(count=6)
可视化检查创建的集合
client.scroll( collection_name=my_collection, limit=10)
图像搜索
加载新图像并提取人脸
load_image_path = '/content/target/Aishw.jpeg'target_image_path = 'black.jpeg'detect_face(load_image_path,target_path)
检查保存的图像
Image.open("/content/black.jpeg")

保存的灰度裁剪的人脸图像
生成Image Embedding
query_embedding = generate_embeddings("/content/black.jpeg")print(type(query_embedding))print(query_embedding.shape)
numpy.ndarray(1, 768)
搜索图像以识别提供的输入图像
results = client.search( collection_name=my_collection, query_vector=query_embedding[0], limit=5, with_payload=True)print(results)files_list= [ os.path.join("/content/target",f) for f in os.listdir("/content/target")]print(files_list)
[ScoredPoint(id=3, version=0, score=0.9999998807907104, payload={'image_id': 3, 'name': 'Aishw'}, vector=None, shard_key=None), ScoredPoint(id=2, version=0, score=0.9999998807907104, payload={'image_id': 2, 'name': 'deepika'}, vector=None, shard_key=None), ScoredPoint(id=1, version=0, score=0.9999998807907104, payload={'image_id': 1, 'name': 'nohra'}, vector=None, shard_key=None), ScoredPoint(id=0, version=0, score=0.9999998807907104, payload={'image_id': 0, 'name': 'kajol'}, vector=None, shard_key=None), ScoredPoint(id=5, version=0, score=0.9999998211860657, payload={'image_id': 5, 'name': 'kareena'}, vector=None, shard_key=None)] ['/content/target/kajol.jpeg', '/content/target/nohra.jpeg', '/content/target/deepika.jpeg', '/content/target/Aishw.jpeg', '/content/target/aish.jpeg', '/content/target/kareena.jpeg']
显示结果的辅助函数
def see_images(results, top_k=2): for i in range(top_k): image_id = results[i].payload['image_id'] name = results[i].payload['name'] score = results[i].score image = Image.open(files_list[image_id]) print(f"Result #{i+1}: {name} was diagnosed with {score * 100} confidence") print(f"This image score was {score}") display(image) print("-" * 50) print()
显示搜索结果 显示前5个匹配图像
see_images(results, top_k=5)
图像搜索结果
结果 #1:Aishw 被诊断为99.99998807907104的置信度。
此图像得分为0.9999998807907104。

— — — — — — — — — — — — — — — — — — — — — — — — —
结果 #2:deepika 被诊断为99.99998807907104的置信度。
此图像得分为0.9999998807907104。

— — — — — — — — — — — — — — — — — — — — — — — — —
结果 #3:nohra 被诊断为99.99998807907104的置信度。
此图像得分为0.9999998807907104。

— — — — — — — — — — — — — — — — — — — — — — — — —
结果 #4:kajol 被诊断为99.99998807907104的置信度。
此图像得分为0.9999998807907104。

— — — — — — — — — — — — — — — — — — — — — — — — —
结果 #5:kareena 被诊断为99.99998211860657的置信度。
此图像得分为0.9999998211860657。

正如您所见,我们使用了一张现有的图像,并获得了其他图像以及原始图像。相似性分数还为我们提供了有关查询图像与数据库中图像相似性的良好指示。
方法2. 使用Transformers和Qdrant进行图像识别
除了OpenCV之外,我们还可以使用Vision Transformers来执行相同的任务。请
查看下面的示例代码:
代码实现
pip install qU qdrantclient transformers datasets
导入所需的库
from transformers import ViTImageProcessor, ViTModelfrom qdrant_client import QdrantClientfrom qdrant_client.http import modelsfrom datasets import load_datasetimport numpy as npimport torch
设置向量存储
# Create a local Qdrant vector storeclient =QdrantClient(path="qdrant_db")my_collection = "image_collection"client.recreate_collection( collection_name=my_collection, vectors_config=models.VectorParams(size=384, distance=models.Distance.COSINE))
加载模型
device = torch.device("cuda" if torch.cuda.is_available() else "cpu")processor = ViTImageProcessor.from_pretrained('facebook/dinovits16')model = ViTModel.from_pretrained('facebook/dinovits16').to(device)
预处理photos文件夹中的图像并加载到数据框中
import pandas as pdimport osimage_file = []image_name = []
for file in os.listdir("/content/photos"):   if file.endswith(".jpeg"):          image_name.append(file.split(".")[0])                 image_file.append(Image.open(os.path.join("/content/photos",file)))
df = pd.DataFrame({"Image":image_file,"Name":image_name})descriptions = df['Name'].tolist()print(descriptions)

使用ViTs生成embedding
在计算机视觉系统中,向量数据库用于存储图像特征。这些图像特征是图像的向量表示,捕捉其视觉内容,用于提高计算机视觉任务的性能,如目标检测、图像分类和图像检索。
为了从图像中提取这些有用的特征表示,我们将使用视觉转换器(Vision Transformers,ViT)。ViT是先进的算法,使计算机能够以类似于人类的方式“看到”和理解视觉信息。它们使用变压器架构处理图像并从中提取有意义的特征。
要理解ViT的工作原理,想象一下你有一个大的拼图,有许多不同的块。为了解决这个拼图,通常会查看各个块,它们的形状以及它们如何拼在一起形成完整的图案。ViT的工作方式类似,意味着与其一次性查看整个图像,视觉转换器将其分解为称为“补丁”的较小部分。这些补丁中的每一个就像拼图的一块,捕捉图像的特定部分,然后ViT对这些块进行分析和处理。
通过分析这些补丁,ViT识别重要的模式,如边缘、颜色和纹理,并将它们结合起来形成对给定图像的一致理解。
final_embeddings = []for item in df['Image'].values.tolist(): inputs = processor(images=item, return_tensors="pt").to(device) with torch.no_grad(): outputs = model(**inputs).last_hidden_state.mean(dim=1).cpu().numpy() final_embeddings.append(outputs)
保存embedding
np.save("vectors", np.array(final_embeddings), allow_pickle=False)
生成元数据
payload = []for i in range(df.shape[0]): payload.append({"image_id" :i, "name":df.iloc[i]['Name']}) ids = list(range(df.shape[0]))embeddings = np.load("vectors.npy").tolist()
从数据存储中搜索图像/照片
for i in range(0, df.shape[0]): client.upsert( collection_name=my_collection, points=models.Batch( ids=[ids[i]], vectors=embeddings[i], payloads=[payload[i]])) client.count( collection_name=my_collection, exact=True,)client.scroll( collection_name=my_collection, limit=10)
从数据存储中搜索图像/照片
img = Image.open("YOUR IMAGE PATH")inputs = processor(images=img, return_tensors="pt").to(device)one_embedding = model(**inputs).last_hidden_state
results = client.search(    collection_name=my_collection,     query_vector=one_embedding.mean(dim=1)[0].tolist(),   limit=5,      with_payload=True)see_images(results, top_k=2)
搜索结果
要搜索的原始图像

搜索结果
结果 #1:Aishw 被诊断为100.00000144622251的置信度。
此图像得分为1.0000000144622252。

— — — — — —— — — — — —
结果 #2:deepika 被诊断为90.48531271076924的置信度。
此图像得分为0.9048531271076924。

— — — — — —
结果 #3:nohra 被诊断为88.62201422801974的置信度。
此图像得分为0.8862201422801974。

— — — — — —
结果 #4:aish 被诊断为87.71421890846095的置信度。
此图像得分为0.8771421890846095。

— — — — — —
结果 #5:kareena 被诊断为86.80090570447916的置信度。
此图像得分为0.8680090570447916。
