一般情况下单台服务器只会部署一个 ElasticSearch node,但是在学习过程中,很多情况下会需要实现 ElasticSearch 的分布式效果,所以需要启动多个节点,但是学习开发环境(不想开多个虚拟机实现多个服务器的效果),所以就想着在一台服务器上部署多个结点(下文以2个结点作为例子),两个节点分别称为实例一、二。
首先将 elasticsearch-5.0.2 文件夹再复制一份
# wuxiwei @ wuxiwei in ~/software
$ cp -R elasticsearch-5.0.2 elasticsearch-5.0.2-node-2
# wuxiwei @ wuxiwei in ~/software
$ ls -l
total 145568
drwxr-xr-x  12 wuxiwei  staff       408 12 11 16:23 elasticsearch-5.0.2
drwxr-xr-x  12 wuxiwei  staff       408 12 11 16:27 elasticsearch-5.0.2-node-2
主要工作就是修改 elasticsearch.yml 配置文件
实例二:config目录下的 elasticsearch.yml 内容
将 node.name: node-1 修改为 node-2,
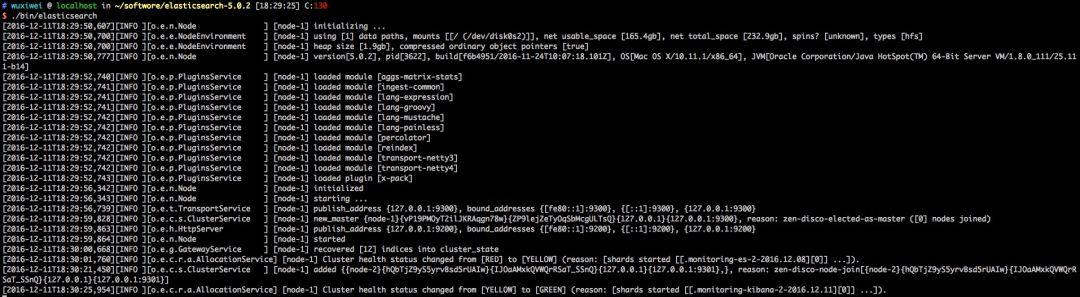
# wuxiwei @ wuxiwei in ~/software/elasticsearch-5.0.2
$ ./bin/elasticsearch
# wuxiwei @ wuxiwei in ~/software/elasticsearch-5.0.2
$ cd ../elasticsearch-5.0.2-node-2
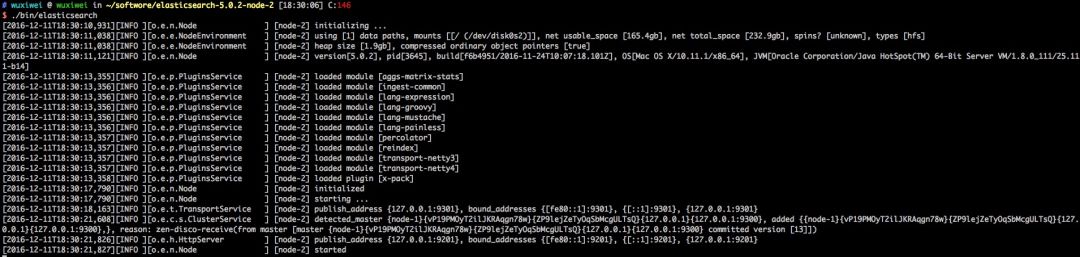
# wuxiwei @ wuxiwei in ~/software/elasticsearch-5.0.2-node-2
$ ./bin/elasticsearch
$ curl -i -XGET 'http://localhost:9200/_cluster/health?pretty'\;
HTTP/1.1 200 OK
content-type: application/json; charset=UTF-8
content-length: 457

{
  "cluster_name" : "my",
  "status" : "green",
  "timed_out" : false,
  "number_of_nodes" : 2,
  "number_of_data_nodes" : 2,
  "active_primary_shards" : 20,
  "active_shards" : 40,
  "relocating_shards" : 0,
  "initializing_shards" : 0,
  "unassigned_shards" : 0,
  "delayed_unassigned_shards" : 0,
  "number_of_pending_tasks" : 0,
  "number_of_in_flight_fetch" : 0,
  "task_max_waiting_in_queue_millis" : 0,
  "active_shards_percent_as_number" : 100.0
}
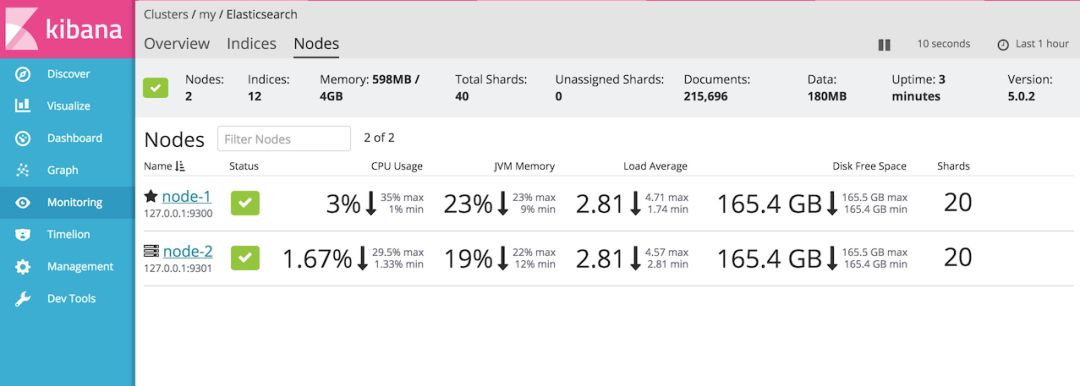
也可以通过 Kibana 查看节点效果
(1)如果修改了配置文件的 http.port、transport.tcp.port 项,一定要将各个节点的值设置不同,否则会出现占用的情况。正常如果不修改,默认会分配值。
(2)示例二开启时,实例一报警告(实际操作中可以忽略,不然将无法实现 ES 的分布式集群作用):
[2016-12-11T18:06:43,678][WARN ][o.e.d.z.ElectMasterService] [node-1] value for setting "discovery.zen.minimum_master_nodes" is too low. This can result in data loss! Please set it to at least a quorum of master-eligible nodes (current value: [-1], total number of master-eligible nodes used for publishing in this round: [2])
是因为默认情况下 discovery.zen.minimum_master_nodes=1 一台服务器只能有一个主节点,所以在实例二的配置文件中可以添加 node.master: false。
(3)示例二不能开启,报如下错误:
[2016-12-11T16:53:02,711][INFO ][o.e.d.z.ZenDiscovery ] [node-2] failed to send join request to master [{node-1}{vP19PMOyT2ilJKRAqgn78w}{jDULCExERXGHp4VXpbyuJA}{127.0.0.1}{127.0.0.1:9300}], reason [RemoteTransportException[[node-1][127.0.0.1:9300][internal:discovery/zen/join]]; nested: IllegalArgumentException[can't add node {node-2}{vP19PMOyT2ilJKRAqgn78w}{qhDDVzwZQ0GXZXhIMmpGKA}{127.0.0.1}{127.0.0.1:9301}, found existing node {node-1}{vP19PMOyT2ilJKRAqgn78w}{jDULCExERXGHp4VXpbyuJA}{127.0.0.1}{127.0.0.1:9300} with the same id but is a different node instance]; ]
[2016-12-11T16:53:02,911][INFO ][o.e.x.m.e.Exporters ] [node-2] skipping exporter [default_local] as it isn't ready yet
[2016-12-11T16:53:02,912
][ERROR][o.e.x.m.AgentService ] [node-2] exception when exporting documents
org.elasticsearch.xpack.monitoring.exporter.ExportException: exporters are either not ready or faulty
at org.elasticsearch.xpack.monitoring.exporter.Exporters.export(Exporters.java:188) ~[x-pack-5.0.2.jar:5.0.2]
at org.elasticsearch.xpack.monitoring.AgentService$ExportingWorker.run(AgentService.java:208) [x-pack-5.0.2.jar:5.0.2]
at java.lang.Thread.run(Thread.java:745) [?:1.8.0_111]
是因为复制的 elasticsearch 文件夹下包含了 data 文件中示例一的节点数据,需要把示例二 data 文件下的文件清空。
作者:wuxiwei
出处:http://t.cn/RIA6XFh
《Linux云计算及运维架构师高薪实战班》2018年07月16日即将开课中,120天冲击Linux运维年薪30万,改变速约~~~~
*声明:推送内容及图片来源于网络,部分内容会有所改动,版权归原作者所有,如来源信息有误或侵犯权益,请联系我们删除或授权事宜。
- END -


更多Linux好文请点击【阅读原文】哦
↓↓↓


