点击下方卡片,关注“小白玩转Python”公众号
测量物体与相机之间的距离在计算机视觉领域中面临着重大挑战,原因包括2D图像中缺乏固有深度信息、透视失真、物体尺寸变化、相机校准要求以及在复杂场景中的遮挡。例如,通过透视投影进行的距离估计依赖于传感器尺寸、焦距和物体的实际高度等变量。这些未知变量的计算增加了任务的复杂性。
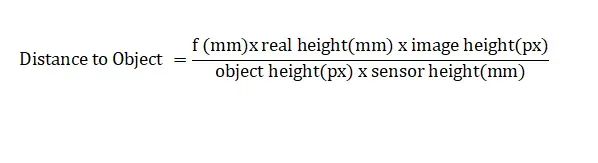
物体距离的公式
一系列基于传统方法和深度学习的方法已经在一段时间内提供了有效的距离估计解决方案。涉及立体视觉的解决方案已被证明在深度计算中是有效而准确的,然而始终在寻找更高效、更经济的替代方案。深度学习在这些限制中显示出色,将可能性的边界推向一个全新的水平,并实现了单目视觉深度估计模型的现实应用,本文将探讨其中的一种方法。
在本文中,将使用MediaPipe姿势估计模块和MiDaS深度估计模型的混合方法来估计物体的距离。但在此之前,让我们快速概述一下本文将涵盖的内容:
MiDaS

MiDaS深度估计模型
MiDaS(Multiple Depth Estimation Accuracy with Single Network)是基于深度学习的残差模型,建立在Res-Net之上,用于单目深度估计。MiDaS已被证明在从单个图像中进行深度估计方面取得了有希望的结果。以下是MiDaS架构的通用概述:
1. 编码器-解码器结构
MiDaS基于编码器-解码器结构,其中编码器部分负责高级特征提取,解码器通过上采样从这些特征生成深度图。
2. 骨干网络:
MiDaS通常使用残差网络(ResNet-50或ResNet-101)进行特征提取,因为它对于消失梯度是稳健的。这允许MiDaS从输入图像中提取多通道特征图,捕捉不同尺度上的分层信息。
3. 多尺度特征融合:
在MiDaS中,使用跳跃连接和特征融合来实现精确的深度估计。通过跳跃连接将早期层的特征图连接到后期层,以在上采样过程中访问低级别的细节。通过特征融合,多尺度特征图结合在一起,以确保对深度估计的局部和全局信息的有效利用。
4. 上采样和细化:
使用上采样生成最终深度图。常用的上采样技术包括双线性插值或转置卷积,以增加特征图的空间分辨率。通过特征融合,将深度图与相应的跳跃连接结合起来,以细化深度估计。
以下是用于距离测量的Python代码:
import cv2import torchimport mediapipe as mpimport numpy as npfrom scipy.interpolate import RectBivariateSpline
mp_pose = mp.solutions.posepose = mp_pose.Pose(static_image_mode=False)
导入所需的包并初始化Media-pipe姿势估计类`mp_pose.Pose`。
#Downloading the model from TorchHub.midas = torch.hub.load('intel-isl/MiDaS','MiDaS_small')midas.to('cpu')midas.eval()
从torch hub下载MiDaS_small模型。您可以通过GitHub一次性下载MiDaS的Python可执行文件。torch hub上有三个MiDaS的变体,可以通过用‘DPT_Large’或‘DPT_Hybrid’替换‘MiDaS_small’来下载。所有三个变体的一般性能如下:
如果您有兼容Cuda的GPU,则可以将`midas.to('cpu')`替换为`midas.to("cuda")`以最大化推断速度。transforms = torch.hub.load('intel-isl/MiDaS','transforms')transform = transforms.small_transform
def depth_to_distance(depth_value,depth_scale): return -1.0/(depth_value*depth_scale)
对MiDaS小模型的输入图像/视频帧进行所需的预处理。接下来,定义了一个名为`depth_to_distance`的函数,用于将计算得到的深度值转换为相应的距离值。cap = cv2.VideoCapture('')while cap.isOpened(): ret, frame = cap.read()
img = cv2.cvtColor(frame,cv2.COLOR_BGR2RGB)
cv2.imshow('Walking',img)
if cv2.waitKey(2) &0xFF == ord('q'): cap.release() cv2.destroyAllWindows()
读取视频输入并使用`cv2.cvtColor`函数进行颜色空间转换。由于cv2以BGR格式读取图像,我们需要将其转换为RGB以进行标准的可视化。让我们运行代码,检查到目前为止是否正常工作。
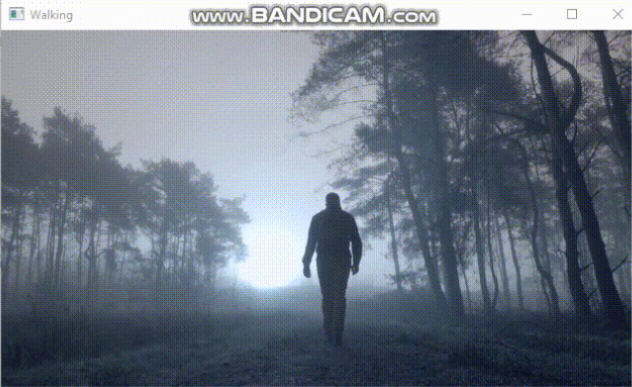
接下来,我们将使用下面的代码从视频帧中提取关键点(landmarks)使用 MediaPipe。
results = pose.process(img)
if results.pose_landmarks is not None: mp_drawing = mp.solutions.drawing_utils mp_drawing.draw_landmarks(img, results.pose_landmarks, mp_pose.POSE_CONNECTIONS)
在这段代码中,首先加载了MiDaS模型和MediaPipe的姿势估计模块,然后对输入图像进行了一系列的预处理。接下来,通过检测姿势关键点,可以在图像上绘制出检测到的关键点。
Extract Landmark Coordinates landmarks = [] for landmark in results.pose_landmarks.landmark: landmarks.append((landmark.x, landmark.y, landmark.z)) waist_landmarks = [results.pose_landmarks.landmark[mp_pose.PoseLandmark.LEFT_HIP], results.pose_landmarks.landmark[mp_pose.PoseLandmark.RIGHT_HIP]] mid_point = ((waist_landmarks[0].x + waist_landmarks[1].x) / 2, (waist_landmarks[0].y + waist_landmarks[1].y) / 2) mid_x , mid_y = mid_point
提取两个关键点的x和y坐标值并计算中点。根据使用情况,可以从Media-pipe的姿势关键点列表中选择任意关键点。接下来,我们将通过MiDaS深度估计模型传递视频以获取深度图。
imgbatch = transform(img).to('cpu')
with torch.no_grad(): prediction = midas(imgbatch) prediction = torch.nn.functional.interpolate( prediction.unsqueeze(1), size=img.shape[:2], mode='bicubic', align_corners=False ).squeeze()
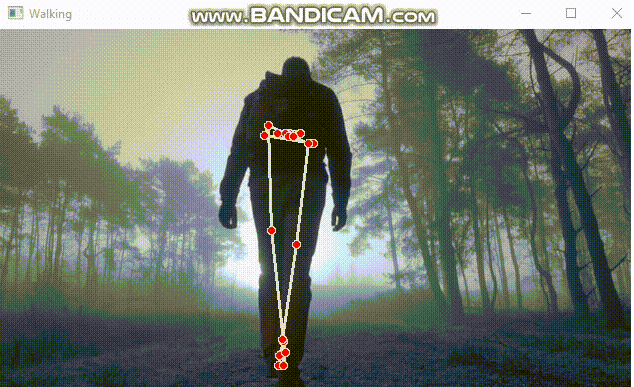
output = prediction.cpu().numpy() output_norm = cv2.normalize(output, None, 0, 1, norm_type=cv2.NORM_MINMAX, dtype=cv2.CV_32F)
cv2.imshow('Walking',output_norm)
上图是通过MiDaS提取的深度图,也可以将`waitKey`的值更改为1以减少帧延迟。您还可以使用下面的代码将深度图的输出更改为彩色图,但在本项目中我们将使用标准的黑白图。
output_norm = (output_norm*255).astype(np.uint8)output_norm = cv2.applyColorMap(output_norm, cv2.COLORMAP_MAGMA)
然后,我们将使用先前提取的腰部关键点来使用MiDaS计算深度值。
h , w = output_norm.shape x_grid = np.arange(w) y_grid = np.arange(h)
spline = RectBivariateSpline(y_grid, x_grid, output_norm)
以上代码片段中使用的样条数组的目的是在非整数网格上创建输出规范数组的平滑连续表示。对样条数组的需求源于对输出预测进行归一化,从而产生一个包含浮点值的数组。通过利用样条对象,可以根据给定的数据插值计算更准确和更灵活的结果或可视化。
depth_scale = 1depth_mid_filt = spline(mid_y,mid_x)depth_midas = depth_to_distance(depth_mid_filt, depth_scale)
cv2.putText(img, "Depth in unit: " + str( np.format_float_positional(depth_mid_filt , precision=3)), (20, 50), cv2.FONT_HERSHEY_SIMPLEX, 1, (255, 255, 255), 3)
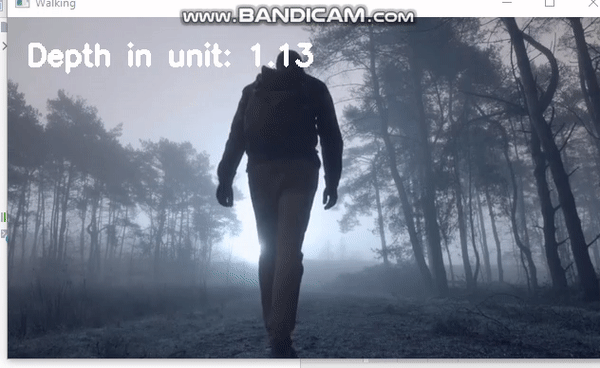
深度值有些波动。为了稳定数值,我们将在深度值上使用指数均值滤波器,然后查看改进。
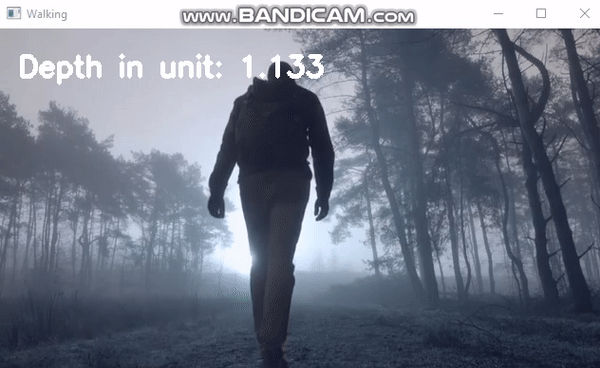
在应用指数均值滤波器后,我们可以看到深度值的波动明显减小。让我们看一下整个代码片段:
import cv2import torchimport matplotlib.pyplot as pltimport mediapipe as mpimport numpy as npimport shutilfrom scipy.interpolate import RectBivariateSpline
mp_pose = mp.solutions.posepose = mp_pose.Pose(static_image_mode=False)
midas = torch.hub.load('intel-isl/MiDaS','MiDaS_small')midas.to('cpu')midas.eval()
transforms = torch.hub.load('intel-isl/MiDaS','transforms')transform = transforms.small_transform
alpha = 0.2previous_depth = 0.0depth_scale = 1.0
def apply_ema_filter(current_depth): global previous_depth filtered_depth = alpha * current_depth + (1 - alpha) * previous_depth previous_depth = filtered_depth # Update the previous depth value return filtered_depth
def depth_to_distance(depth_value,depth_scale): return 1.0 / (depth_value*depth_scale)
def depth_to_distance1(depth_value,depth_scale): return -1.0 / (depth_value*depth_scale)
cap = cv2.VideoCapture('distance1.mp4')while cap.isOpened(): ret, frame = cap.read()
img = cv2.cvtColor(frame, cv2.COLOR_BGR2RGB)
results = pose.process(img)
if results.pose_landmarks is not None:
landmarks = [] for landmark in results.pose_landmarks.landmark: landmarks.append((landmark.x, landmark.y, landmark.z))
waist_landmarks = [results.pose_landmarks.landmark[mp_pose.PoseLandmark.LEFT_HIP], results.pose_landmarks.landmark[mp_pose.PoseLandmark.RIGHT_HIP]]
mid_point = ((waist_landmarks[0].x + waist_landmarks[1].x) / 2, (waist_landmarks[0].y + waist_landmarks[1].y) / 2,(waist_landmarks[0].z + waist_landmarks[1].z) /2) mid_x,mid_y = mid_point
imgbatch = transform(img).to('cpu')
with torch.no_grad(): prediction = midas(imgbatch) prediction = torch.nn.functional.interpolate( prediction.unsqueeze(1), size=img.shape[:2], mode='bicubic', align_corners=False ).squeeze()
output = prediction.cpu().numpy() output_norm = cv2.normalize(output, None, 0, 1, norm_type=cv2.NORM_MINMAX, dtype=cv2.CV_32F)
h, w = output_norm.shape x_grid = np.arange(w) y_grid = np.arange(h)
spline = RectBivariateSpline(y_grid, x_grid, output_norm) depth_mid_filt = spline(mid_y,mid_x) depth_midas = depth_to_distance(depth_mid_filt, depth_scale) depth_mid_filt = (apply_ema_filter(depth_midas)/10)[0][0] cv2.putText(img, "Depth in unit: " + str( np.format_float_positional(depth_mid_filt , precision=3)) , (20, 50), cv2.FONT_HERSHEY_SIMPLEX, 1, (255, 255, 255), 3) cv2.imshow('Walking',img)
if cv2.waitKey(1) &0xFF == ord('q'): cap.release() cv2.destroyAllWindows()
结论
在本文中,我们利用MiDaS深度估计模型计算了物体与相机之间的距离,同时利用了从Media-pipe提取的参考关键点。这种方法可以用于检测多个物体/人的距离,并集成到基于接近性的小型项目中。


